This tutorial is described assuming the reader having basic knowledge on 3d max. Also all dimensions of the object will not be given in the tutorial. The dimensions which are given are in accordance with my reference model. You may use the same value, take values from a reference object or any value you like. Today you will learn that how to make toothbrush in 3d max.
After getting good response on How to Make Tooth Paste in 3D Studio Max we are presenting an other 3D Studio Max Tutorial “How to Mak Tooth Brush in 3D Studio Max” from one of the best tutorials site called Tutorials Palace. Hope you will also like this tutorial.
How to Make Tooth Brush in 3D Studio Max
Tools used:
Standard Primitives, Polygon Modeling, FFD Box.
Step 1:
Create cylinder from standard
primitives with following
parameters.

Step 2:
Select the object and copy using
(shift + move) in following position.

Step 3:
Select one object and convert to
poly.

Step 4:
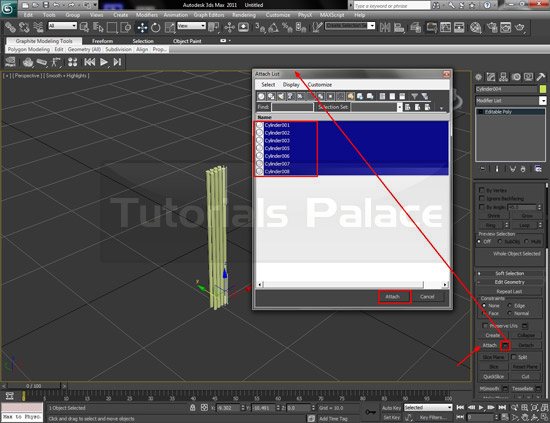
- Click on multiple attach button.
- Add all objects and click on Attach.
Step 5:
Create cylinder from standard
primitives with following
parameters.

Step 6:
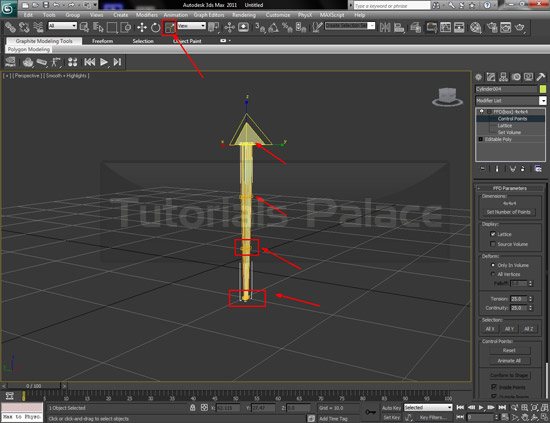
Click on the control points..

Step 7:
Adjust the position of the points by
selecting and moving the following
points.
Step 8:
Copy the object in following positions.

Step 9:
- Press (M) key for material editor.
- create two different material with blueand white color.

Step 10:
- Go to the top viewport.
- create box.

Step 11:
Adjust the box position and scale.

Step 12:
Convert this object to poly.

Step 13:
Turn on the polygon and select
following faces.
Apply bevel.

Step 14:
Adjust the position of the vertices by
selecting and moving vertex.

Step 15:
Go to the top view port Adjust the
following vertices .

Step 16:
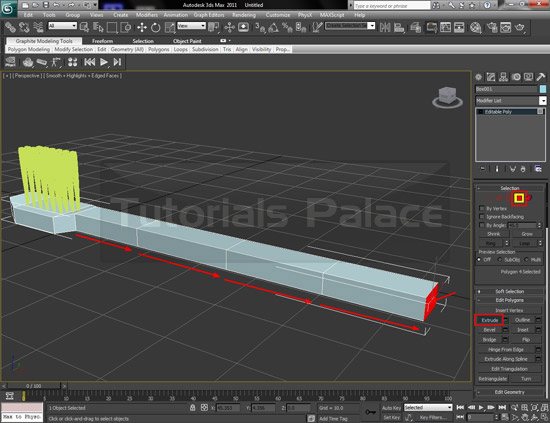
Select the face and apply extrude.
Step 17:
Adjust the vertices.

Step 18:
Object shape from the left view port.

Step 19:
Object shape from the top view port.

Step 20:
Go to the edit and click on the
swift loop button to add segments.

Step 21:
Create following segments using
swift loop for tighten edge.

Step 22:
Go to the edit again and turn on the
use Nurms for Mesh smooth.

Step 23:
- Open the use nurms drop downpanel.
- Increase the number ofiterations for more mesh smooth.

Step 24:
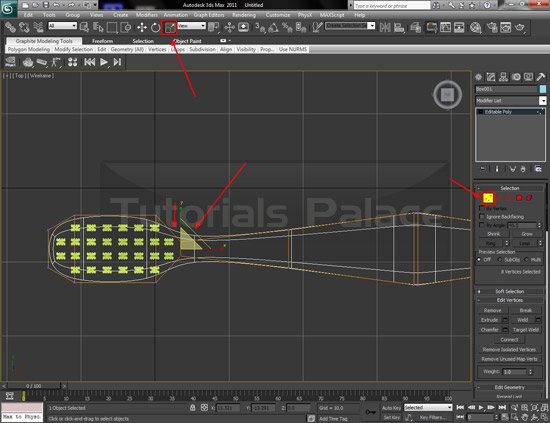
- Go to the top view
- Adjust the following vertices positionfor final shape of the object .
Step 25:
Shape from left view.
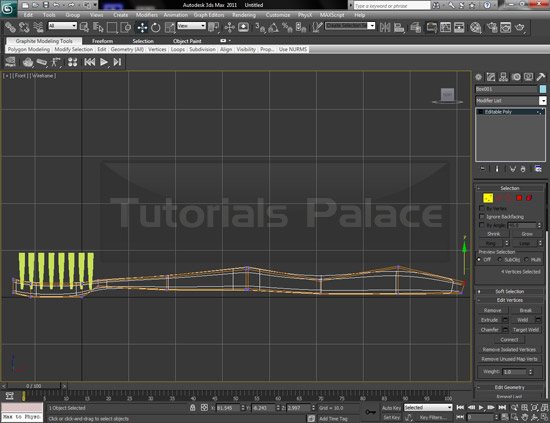
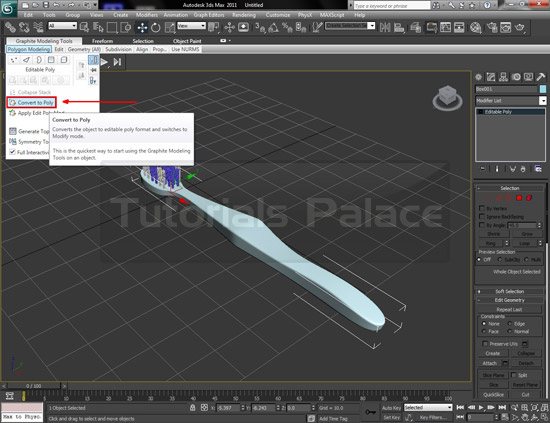
Step 26:
Convert this object to poly again.
Step 27:
Turn on the polygon Select
following faces.

Step 28:
Bevel these faces for grip shape.

Step 29:
- Select all the objects in the scene.
- Go to the group on the main toolbar.
- Click on the group for grouping the object.

Step 30:
Select all and group.

Step 31:
Create plane object for ground base.

Step 32:
- Open material editor and create plastic material for brush handle.
- Change the following materialparameters.
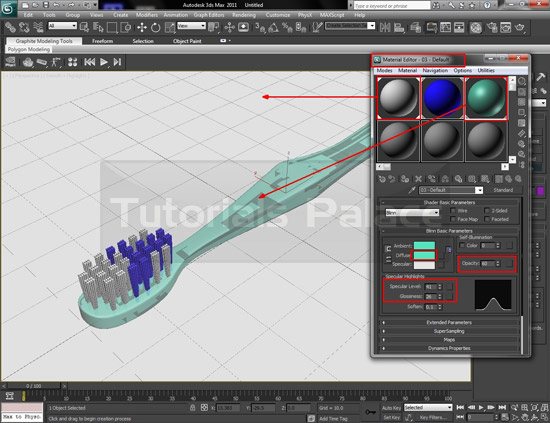
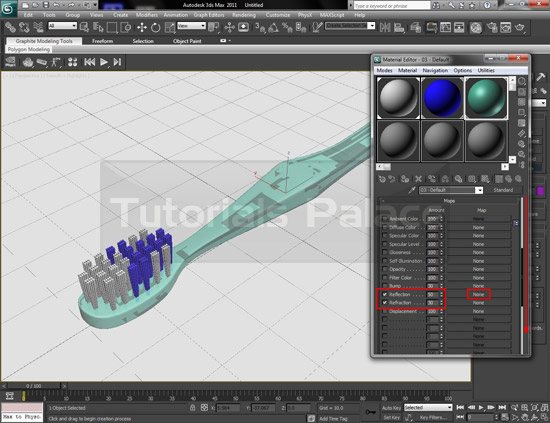
Step 33:
- Scroll down the selected material panel.
- Turn on the reflection and also refraction.
Step 34:
Click on the reflection button and
add image base reflection.
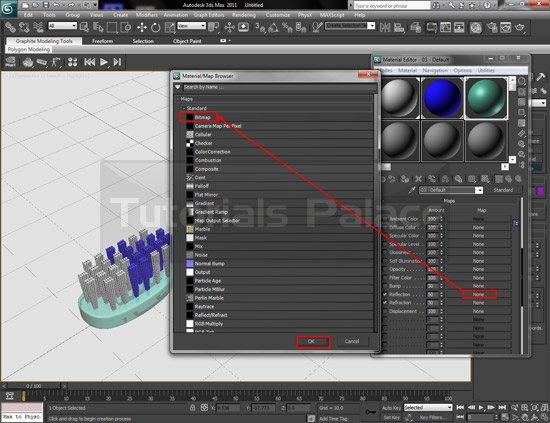
Step 35:
Use this image in above step.

Step 36:
- Go back and click on the refraction button and select ray trace.
- Close the material editor.
- Create lights
- Render the scene

Final:
Select local normal extrude type and set extrude value(.3) and click ok.
If you like this post, share it with your friends through email and social networks. Please don’t forget to  subscribe to our RSS-feed,
  follow us on Twitter and like our
 ![]() facebook Fan page for recent updates.
facebook Fan page for recent updates.
